
Who doesn’t want shiny, vibrant hair that looks like it’s fresh from the salon? Though this can be done considerably by frequenting salons, it entails a lot of time and expense. There’s an easier way to get that coveted glossy look right in your bathroom. Gloss treatments have been great, cost-efficient ways to enhance shine, color, and general hair health. The following guide will take you through a hair gloss treatment at Home. you can do at home to give your hair that professional look and feel without having to leave the comfort of your house.
1. Understanding Hair Gloss Treatment at Home
First, it is essential to understand what a hair gloss treatment is and why it is beneficial before digging into how it’s done. A hair gloss refers to a kind of semi permanent treatment that shines your hair, smoothens it, or sometimes adds color. Hair gloss is gentle, unlike harsh chemical treatments, and works at the surface of your hair to seal your cuticles and enhance your natural color or freshen up your dyed locks.
Hair glosses can also be clear or colored. The clear ones are great for giving shine and to help eliminate frizz, while a tinted gloss can enrich your current color, tone down brassiness, or add a subtle tint. The best part? The results typically last four to six weeks, ample time to enjoy your glossy, healthy-looking hair.
2. How to Choose the Right Product for Hair Gloss Treatment at Home
Hair gloss products differ in formulation, with various professional-grade glosses and more affordable options available in the market. The choice depends on your hair type, texture, and color.
For those who have color-treated hair, a colored gloss matching your current color will keep vibrancy and prolong your dye. But if you have no objection to your natural color and just wish to give your shine an extra boost, clear gloss is all you’ll need. Secondly, it’s essential to select a no-harsh-chemical product without ammonia and parabens to make sure you don’t irritate sensitive skin or cause hair damage.
3. Preparing for Hair Gloss Treatment at Home

Preparation is the key to ensuring that your hair gloss treatment goes through without hitches. First, prepare everything you will need. You will need the hair gloss product of your choice, gloves, a comb, hair clips, a towel, and an old T-shirt for your clothes protection. It is also advisable to carefully read the instructions on the product before commencing.
Shampoo your hair with clarifying shampoo afterward. This is necessary because any product buildup on your hair, or even oils, might interfere with the gloss adhering. While doing this, make sure not to use conditioner, as that would create some kind of blockage that could interfere with the results. Afterwards, take a towel and gently blow your hair until it’s damp but not dripping wet.
4. Application of Hair Gloss
Now, the fun part, as one may say—the actual application of hair gloss. Section your hair first with hair clips to facilitate equal application and to avoid missing any strands of hair. If needed, mix according to the instructions on the product and put on your gloves to protect your hands.
Begin to apply the gloss, starting from the roots all the way to the ends, in small sections. Then use a comb to work the product well through your hair. Ensure each part of your hair is covered to even it out. Let the gloss be on your hair for the recommended time as indicated on the packaging. Most fall between 10 and 20 minutes.
While this sets in, put a shower cap over your hair to stop the gloss from dripping all over the place and to help its penetration. Relax for a couple of minutes, as you will shortly see great results in your hair.
5. Rinsing and Finishing Touches
When the waiting period is complete, it’s time to rinse the gloss out. Take lukewarm water and start thoroughly washing your hair until the water runs clear. The usage of shampoo is not preferred since it would take away the gloss even before it has set. Apply a conditioner to add that extra moisture to lock in the shine.
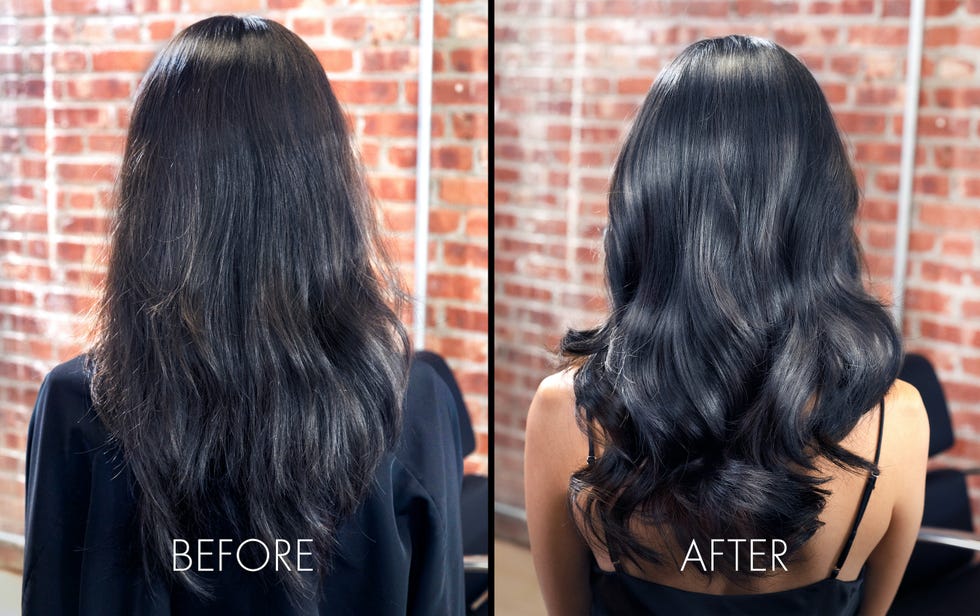
Once you have rinsed the gloss out, gently towel-dry your hair and let it air dry, or use a blow dryer on the low heat setting. As your hair is drying, you will begin to see the results: shiny, smooth, vibrant hair that looks like you’ve just come out of the salon. To get the most from this treatment, try avoiding washing your hair for at least 24 hours after the treatment to give the gloss time to attach fully to the hair.
6. How to Maintain Your Hair Glossy
To keep your hair gloss for longer, you will want to take a few easy steps in the way you care for your hair. You should use sulfate-free shampoos and conditioners since sulfates can strip the gloss off by fading the color. You can also do a weekly deep conditioning treatment to keep the moisture and shine.
Also, reduce your usage of heat styling tools, as too much heat may damage the hair and won’t keep the gloss on for a longer period. Therefore, use a heat-protectant spray each time you use these styling tools.
Conclusion
Shiny hair doesn’t have to be left in the hands of a pricey salon visit. You can easily add some shine, color, and overall appearance to your hair with a hair gloss treatment in the comfort of your own home. With these easy steps, you will be able to ensure that you are creating a salon-worthy result and making your hair look and feel its best. Give your hair the chance to enjoy a gloss treatment—an easy and great way to up the ante on your hair care routine. Follow this simple guide for hair gloss treatment at home.